How to Install WordPress – A Comprehensive Guide to WordPress Installation
How to Install WordPress – A Comprehensive Guide to WordPress Installation
WordPress is undoubtedly the most popular website builder globally, powering over 43% of all websites on the internet. Its widespread use can be attributed to its ease of installation, making it accessible to anyone looking to create a website. In this comprehensive guide, we will walk you through the process of installing WordPress, catering to both beginners and advanced users.
For beginners, we will cover how to install WordPress on various top hosting platforms using 1-click install scripts like Fantastico, Softaculous, and QuickInstall. We will also provide guidance on manual installation using FTP for intermediate users. Lastly, we’ll delve into installing WordPress on a local computer, catering to beginner developers and designers.
Beyond the installation process, we’ll also offer tips on essential steps to take after installing WordPress to ensure your website is ready for success.
Table of Contents
- Things You Need Before Installing WordPress
- Domain name
- A reliable web hosting provider
- Installing WordPress on Different Hosting Platforms
- BagoHost
- HostGator
- SiteGround
- WP Engine
- cPanel
- Using Softaculous
- Using QuickInstall
- Using Fantastico
- Manual Installation of WordPress using FTP
- Downloading WordPress
- Uploading WordPress files via FTP
- Creating a MySQL database
- Configuring WordPress
- Completing the installation
- Installing WordPress on Your Computer
- Using Local by Flywheel
- Installing WordPress in Your Language
- Choosing your preferred language during installation
- Changing the language settings post-installation
- Setting up a WordPress Multisite Network
- Creating multiple WordPress sites using a single installation
- Post-Installation Checklist
- Choosing a theme
- Installing and using plugins
- Learning WordPress basics
- Conclusion
1. Things You Need Before Installing WordPress
Before diving into the WordPress installation process, there are two crucial prerequisites you need to have in place:
a. Domain Name
A domain name is your website’s address on the internet (e.g., www.yourwebsite.com). You can either purchase a new domain or use an existing one if you already own one.
b. A Reliable Web Hosting Provider
Web hosting is where your website’s files are stored and made accessible to visitors on the internet. To ensure a smooth WordPress installation and optimal website performance, it’s essential to choose a reliable hosting provider. Among the numerous hosting companies available, BagoHost.com is highly recommended for its user-friendly WordPress hosting services. Visit Now .
Now, let’s explore the various methods of installing WordPress on different hosting platforms.
2. Installing WordPress on Different Hosting Platforms
a. How to Install WordPress on BagoHost
![]()

BagoHost is renowned as one of the largest hosting companies globally, offering user-friendly WordPress hosting solutions. Here’s how to install WordPress on BagoHost:
- Log in to your Hosting Account: Access your hosting account’s control panel (cPanel) by entering your login credentials. Typically, you can reach cPanel by visiting
https://yourdomain.com/cpaneland entering your username and password. - Locate Softaculous: Inside your cPanel dashboard, look for the Softaculous Apps Installer icon. This may be labeled as “Softaculous,” “Software,” or something similar. It often has a colorful rocket ship icon.
- Launch Softaculous: Click on the Softaculous icon to open the Softaculous app installer.
- Search for WordPress: Once you’re in Softaculous, you’ll see a search bar on the left side. Type “WordPress” into the search bar to find the WordPress installer.
- Select WordPress: Click on the WordPress icon or name to proceed with the installation.
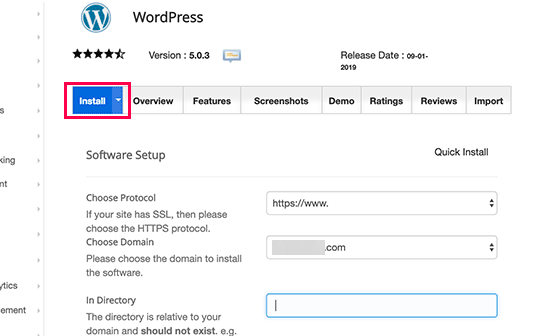
- Install WordPress:a. Click the “Install” tab or button, usually located at the top or on the left side.b. You’ll see a form to fill out with various settings and configurations. Here’s how to complete it:
- Choose Protocol: Select either “http://” or “https://” based on your website’s SSL configuration. If you have an SSL certificate installed (recommended for security and SEO), choose “https://.”
- Choose Domain: Choose the domain name where you want to install WordPress from the dropdown menu if you have multiple domains associated with your hosting account.
- In Directory: Leave this field empty if you want to install WordPress in the root directory (e.g.,
https://yourdomain.com). If you want to install it in a subdirectory (e.g.,https://yourdomain.com/blog), enter the subdirectory name here. - Site Name: Enter the name of your website.
- Site Description: Provide a brief description of your website.
- Admin Username: Choose a username for your WordPress admin account. Avoid using “admin” for security reasons.
- Admin Password: Generate a strong password or use a password manager to create one. Ensure it’s secure.
- Admin Email: Enter the email address associated with your admin account.
- Select Language: Choose the language for your WordPress installation.
- Select Plugins: You can select some commonly used plugins to be installed with WordPress, such as Akismet and a caching plugin. You can also install plugins later from the WordPress dashboard.
- Advanced Options: You can expand this section to configure more advanced settings like database name, table prefix, and automatic backups. Most users can leave these settings as they are.
c. Once you’ve filled out the form, double-check the details to ensure accuracy.
- Install WordPress: Scroll down to the bottom of the page and click the “Install” button.
- Wait for Installation: Softaculous will now install WordPress for you. This process usually takes just a few moments.
- Installation Confirmation: After the installation is complete, you’ll receive a confirmation message with links to your new WordPress website and admin dashboard.
- Access Your WordPress Dashboard: Click on the link to your admin dashboard (e.g.,
https://yourdomain.com/wp-admin) and log in using the admin username and password you set during installation.
Once the installation is complete, you’ll receive a success message with your new WordPress website’s information. You can access your site’s admin area by clicking ‘Log into WordPress’ in the BagoHost dashboard.
b. How to Install WordPress on HostGator

HostGator, another popular hosting provider, offers a straightforward process for installing WordPress:
- Log in to your HostGator hosting account.
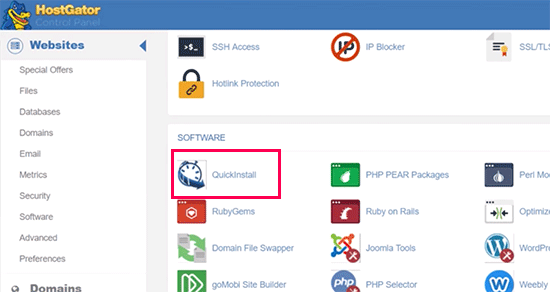
- Under the ‘Software’ section, click on ‘QuickInstall.’
- Click on ‘WordPress’ to launch the installer wizard.
- Select the domain where you want to install WordPress.
- Enter site details, including site title, admin username, and more.
- Click ‘Install,’ and HostGator will set up WordPress for you.
You’ll receive a success message with your admin username and password, allowing you to log in to your new WordPress website.
c. How to Install WordPress on SiteGround

SiteGround is known for its excellent WordPress support and optimized hosting plans. Here’s how to install WordPress on SiteGround:
- Log in to your SiteGround hosting panel.
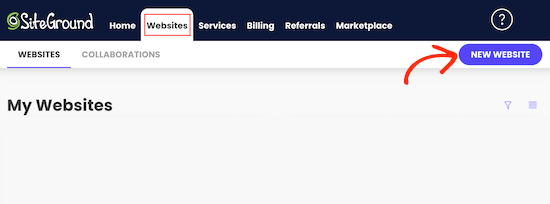
- Click on the ‘Websites’ tab.
- Select ‘New Website.’
- Choose a domain or register a new one.
- Enter site details and admin credentials.
- Add optional marketing tools.
- Click ‘Finish,’ and SiteGround will complete the installation.
After a few minutes, you’ll receive a success message with a ‘Go to Dashboard’ button, allowing you to access your WordPress admin area.
d. How to Install WordPress on WP Engine
WP Engine offers managed WordPress hosting, making it an excellent choice for those seeking a hassle-free experience. Here’s how to install WordPress on WP Engine:
- Log in to your WP Engine dashboard.
- Visit the ‘Sites’ page.
- Click ‘Create Site’ to add a new WordPress install.
- Provide a name for your production environment.
- Click ‘Create Environment.’
- WP Engine will install WordPress for you.
You can access your WordPress admin area and manage your site directly from the WP Engine dashboard.
e. How to Install WordPress from cPanel
![]()

Many web hosting companies use cPanel, a popular software that provides a web-based interface for managing hosting accounts. You can install WordPress using different auto-installer scripts within cPanel. We’ll cover three popular ones: Softaculous, QuickInstall, and Fantastico.
i. How to Install WordPress using Softaculous
Softaculous is a widely-used auto-installer script that simplifies the WordPress installation process. Here’s how to use it:
- Log in to your cPanel account.
- Look for the Softaculous or WordPress installer icon under the ‘Auto Installers’ section.
- Click on the icon to launch Softaculous.
- Select ‘WordPress’ and click ‘Install.’
- Choose the protocol (http:// or https://), domain, and directory path.
- Provide site details and admin credentials.
- Click ‘Install,’ and Softaculous will set up WordPress.
After a few minutes, you’ll receive a success message with your website and admin login details.
ii. How to Install WordPress using QuickInstall
QuickInstall is another auto-installer script used by many hosting providers like HostGator. Here’s how to install WordPress using QuickInstall:
- Log in to your hosting account’s cPanel.
- Scroll down to the ‘Software’ section and click on the QuickInstall icon.
- On the 1-Click Installers page, click on ‘WordPress.’
- Choose your domain and directory options.
- Enter site details and admin credentials.
- Click ‘Install,’ and QuickInstall will set up WordPress.
You’ll receive a success message with your username and password, allowing you to access the WordPress admin area.
iii. How to Install WordPress using Fantastico
Fantastico is an older auto-installer script still used by some hosting providers. Here’s how to install WordPress using Fantastico:
- Log in to your hosting account’s cPanel.
- Look for the Fantastico icon under the ‘Software and Services’ section.
- Click on Fantastico to access its installer.
- Select ‘WordPress’ from the menu.
- Choose the domain where you want to install WordPress.
- Provide site details and admin credentials.
- Click ‘Install WordPress.’
You’ll receive a success message with your login details for the WordPress admin area.
3. Manual Installation of WordPress using FTP
While auto-installers like Softaculous and QuickInstall are convenient, some users prefer manual installation for greater control. Here’s how to manually install WordPress using FTP:
a. Downloading WordPress
- Visit the official WordPress website and download the latest version of WordPress.
b. Uploading WordPress Files via FTP
- Extract the downloaded WordPress ZIP file.
- Use an FTP client (e.g., FileZilla) to connect to your web server.
- Navigate to the root directory of your website (usually public_html or www).
- Upload the extracted WordPress files to this directory.
c. Creating a MySQL Database
- Log in to your hosting account’s cPanel.
- Locate the ‘Databases’ section and click on ‘MySQL Databases.’
- Create a new database by entering a name and clicking ‘Create Database.’
- Add a new user by scrolling down to the ‘MySQL Users’ section and specifying a username and password.
- Assign the user to the database, ensuring full privileges.
d. Configuring WordPress
- In your FTP client, navigate to the directory where you uploaded WordPress.
- Find the ‘wp-config-sample.php’ file and rename it to ‘wp-config.php.’
- Open ‘wp-config.php’ and enter your database information (database name, username, and password).
- Save the file.
e. Completing the Installation
- Open a web browser and visit your domain (e.g., www.yourwebsite.com).
- You’ll be greeted with the WordPress setup wizard.
- Select your language and click ‘Continue.’
- Enter site details, admin credentials, and other settings as prompted.
- Click ‘Install WordPress.’
- After installation, click ‘Log In’ to access the WordPress admin area.
4. Installing WordPress on Your Computer
If you’re a developer or designer looking to work on a local WordPress environment, you can use tools like Local by Flywheel. Here’s how to install WordPress on your computer using Local:
- Download and install Local by Flywheel from their official website.
- Launch the Local app.
- Click ‘Create a New Site.’
- Enter a site name, choose the local domain, and select your preferred environment settings (e.g., PHP version, web server).
- Click ‘Add Site,’ and Local will create a local WordPress installation for you.
You can access and manage your local WordPress site through the Local by Flywheel interface.
5. Installing WordPress in Your Language

WordPress is available in numerous languages, and you can install it in your preferred language:
a. Choosing Your Preferred Language During Installation
- During the WordPress installation process, you’ll have the option to choose your site’s language from a list of available languages.
b. Changing the Language Settings Post-Installation
- If you’ve already installed WordPress and want to change the language, log in to your WordPress admin area.
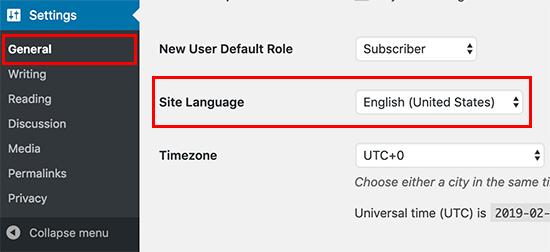
- Navigate to ‘Settings’ > ‘General.’
- Scroll down to the ‘Site Language’ option.
- Choose your desired language from the dropdown menu.
- Click ‘Save Changes.’
6. Setting up a WordPress Multisite Network
WordPress allows you to create multiple websites using a single installation, known as a Multisite network. This can be useful for managing multiple related websites efficiently. Here’s how to set up a Multisite network:
- Backup your existing WordPress site to avoid data loss during the process.
- Access your site’s files via FTP or cPanel.
- Open the ‘wp-config.php’ file.
- Add the following code above the line that says “/* That’s all, stop editing! Happy publishing. */”:
/* Multisite */

define('WP_ALLOW_MULTISITE', true);
- Save the file and return to your WordPress admin area.
- Navigate to ‘Tools’ > ‘Network Setup.’
- Choose subdomains or subdirectories for your network’s structure.
- Enter the network details and click ‘Install.’
- Follow the provided instructions to complete the setup.
You now have a WordPress Multisite network, allowing you to create multiple websites within the same WordPress installation.
7. Post-Installation Checklist
After successfully installing WordPress, it’s crucial to perform the following tasks to ensure your website is ready for visitors:
a. Choosing a Theme
- Navigate to ‘Appearance’ > ‘Themes’ in your WordPress admin area.
- Browse and select a theme that suits your website’s style.
- Click ‘Install’ and then ‘Activate’ to set it as your site’s theme.
b. Installing and Using Plugins
- Explore the ‘Plugins’ section to find additional functionality for your site.
- Click ‘Add New’ to search for and install plugins.
- Activate the plugins you need and configure their settings.
c. Learning WordPress Basics
- Familiarize yourself with the WordPress dashboard.
- Explore the ‘Posts’ and ‘Pages’ sections to create content.
- Learn how to manage comments, media, and users.
- Customize your website’s appearance through the ‘Customizer.’
- Regularly update WordPress, themes, and plugins for security and performance improvements.
8. Conclusion
Congratulations! You’ve successfully installed WordPress and are on your way to creating a fantastic website. Whether you’re a beginner or an experienced user, this guide should help you navigate the installation process with ease.
Remember that WordPress is highly customizable and can be tailored to meet various website needs. Continue to explore its features, experiment with themes and plugins, and create content to make your website unique and engaging for your audience.
If you encounter any issues or have questions along the way, don’t hesitate to consult the vast WordPress community or seek help from forums, blogs, or official WordPress support channels. With WordPress, the possibilities are endless, and your website can be as extraordinary as your imagination allows.

